React中沒有類似Angular那樣的雙向數據綁定,在做一些表單復雜的后臺類頁面時,監聽、賦值、傳遞、校驗時編碼相對復雜,滿屏的樣板代碼傷痛欲絕,故引入可以解決這些問題的
redux-form(v6) 模塊。本文大致翻譯了官方文檔一些比較重要的地方,結合官方Demo加入了一些特性,有些官方跑不起來的地方也進行了優化。
- 項目地址: https://github.com/tedyuen/react-redux-form-v6-example
- 在線演示地址
- 本地演示方法:
npm install && npm run start - 如對翻譯有困惑,請移步官方文檔,對Demo的理解有異議歡迎留言或私信。轉載請注明出處Ted Yuen
目錄
<h2 id="getting-started">起步</h2>
在使用 redux-form 之前,需要具備以下基礎:
關于 redux-form 的三個主要模塊:
-
formReducer reducer: 表單的各種操作以 Redux action 的方式,通過此 reducer 來促使 Redux store 數據的變化。 -
reduxForm() HOC: 此高階組件用以整合 Redux action 綁定的用戶交互與您的組件,并返回一個新的組件供以使用。 -
<Field/>: 用此代替您原本的<input/>組件,可以與redux-form的邏輯相連接。
數據流:
在大部分情況下您不需要關心如何創建action,一切都是自動的。下圖展示了一個簡易的數據流:
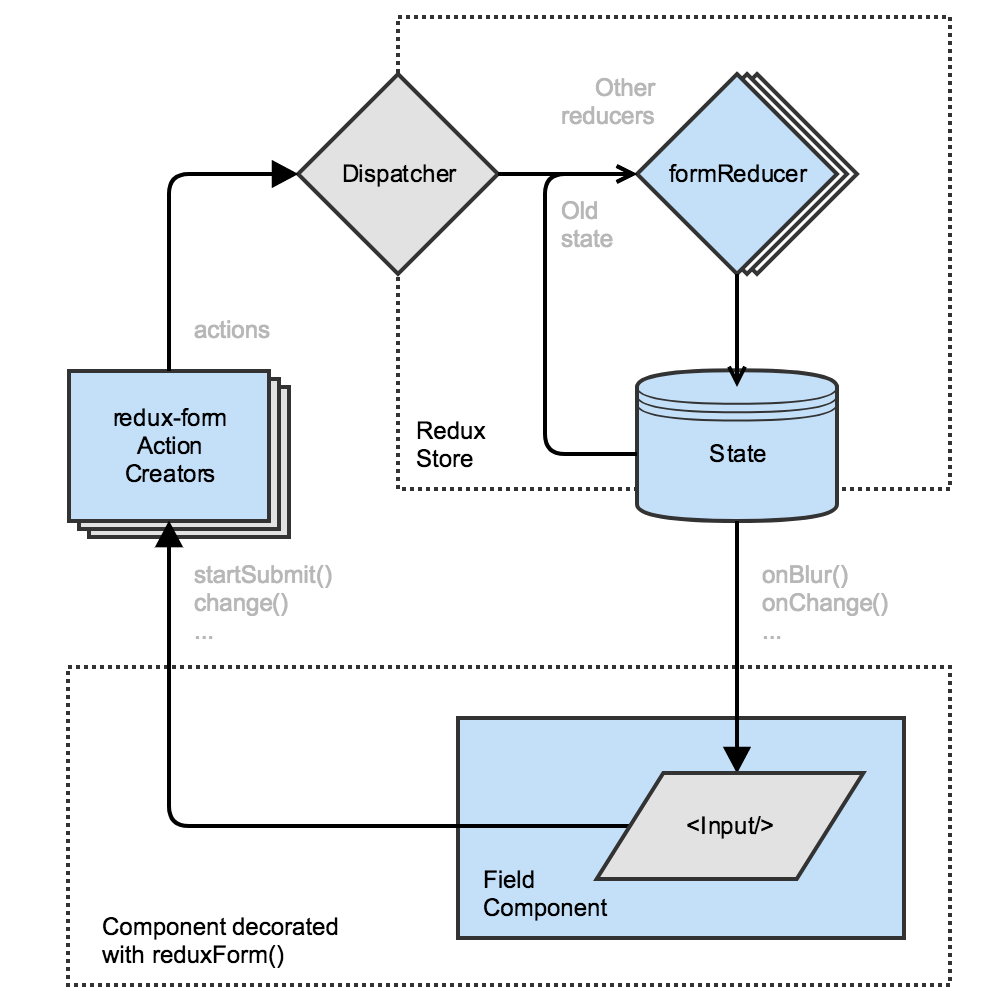
舉個簡單的例子,我們有一個被 reduxForm() 創建的表單組件,里面有一個用 <Field/> 創建的 <input/> 組件,數據流大概是這個樣子的:
- 用戶點擊這個
<input/>組件, - "Focus action" 被觸發,
- formReducer 更新了對應的狀態,
- 這個狀態被傳回
<input/>組件中。
與此類似的在這個 <input/> 中輸入文字、更改狀態、提交表單,也是遵循以上這個流程。
redux-form 還能基于此流程處理許多事情,諸如:表單驗證與格式化,多參數與action的創建。基于以下的向導,請自助挖掘更深層次的功能。
基本使用向導
步驟 1/4: Form reducer
store需要知道組件如何發送action,因此我們需要在您的store中注冊 formReducer,他可以服務于整個app中你定義的所有表單組件,因此只需要注冊一次。
import { createStore, combineReducers } from 'redux'
import { reducer as formReducer } from 'redux-form'

const rootReducer = combineReducers({
  // ...your other reducers here
  // you have to pass formReducer under 'form' key,
  // for custom keys look up the docs for 'getFormState'
  form: formReducer
})

const store = createStore(rootReducer)
注: 在reducer中合并的formReducer的key必須命名為"form"。如果您因某些原因需要自定義key,請移步 getFormState config查看詳情。
步驟 2/4: Form component
為了使您的表單組件可以與store進行交互,我們需要使用高價函數 reduxForm() 來包裹您的組件。他可以在您執行提交表單等操作的時候,以props的方式提供表單內的state。
import React from 'react'
import { Field, reduxForm } from 'redux-form'

let ContactForm = props => {
  const { handleSubmit } = props
  return (
    <form onSubmit={ handleSubmit }>
      { /* form body*/ }
    </form>
  )
}

ContactForm = reduxForm({
  // a unique name for the form
  form: 'contact'
})(ContactForm)

export default ContactForm;
現在我們已經有一個表單組件了,讓我們添加一些input組件。
注: 如果您覺得 ()() 這類的語法很迷惑,您可以把它分兩步來看:
// ...

// create new, "configured" function
createReduxForm = reduxForm({ form: 'contact' })

// evaluate it for ContactForm component
ContactForm = createReduxForm( ContactForm )

export default ContactForm;
步驟 3/4: Form <Field/> Components
<Field/> 組件可以連接所有input類型組件的數據到store中,基本用法如下:
<Field name="inputName" component="input" type="text" />
它創建了一個text類型的<input/>組件,還提供了諸如 value onChange onBlur等屬性,用于跟蹤和維護此組件的各種狀態。
注: <Field/> 組件很強大,除了基本的類型,還可以配置類或者無狀態組件,欲了解更多,請移步Field usage。
import React from 'react'
import { Field, reduxForm } from 'redux-form'

const ContactForm = props => {
  const { handleSubmit } = props
  return (
    <form onSubmit={ handleSubmit }>
      <div>
        <label htmlFor="firstName">First Name</label>
        <Field name="firstName" component="input" type="text" />
      </div>
      <div>
        <label htmlFor="lastName">Last Name</label>
        <Field name="lastName" component="input" type="text" />
      </div>
      <div>
        <label htmlFor="email">Email</label>
        <Field name="email" component="input" type="email" />
      </div>
      <button type="submit">Submit</button>
    </form>
  )
}

ContactForm = reduxForm({
  // a unique name for the form
  form: 'contact'
})(ContactForm)

export default ContactForm;
從現在開始,表單上的操作數據已經可以填充至store,并可以執行提交表單操作了。
步驟 4/4: Reacting to submit
提交的數據以JSON對象的形式注入了此表單組件的 onSubmit 方法里了,可以打印出來看:
import React from 'react'
import ContactForm from './ContactForm'

class ContactPage extends React.Component {
  submit = (values) => {
    // print the form values to the console
    console.log(values)
  }
  render() {
    return (
      <ContactForm onSubmit={this.submit} />
    )
  }
}
<h2 id="field-value-lifecycle">表單value的生命周期</h2>
本節對理解您的組件value通過 redux-form 的流向很重要
Value 生命周期鉤子函數
redux-form 提供了3個 value 生命周期鉤子函數,通過props傳遞給Field組件,并且都是可選的。
format(value:Any) => String
格式化從store里拿出來的數據渲染到組件里,通常會在store保留原來的數據類型,只是在組件中使用的時候進行格式化。
parse(value:String) => Any
把用戶輸入的string類型的數據進行格式轉化,放入store供你使用,也會在store保留轉化后類型的數據。
normalize(value:Any, previousValue:Any, allValues:Object, previousAllValues:Object) => Any
允許您對當前字段數據添加某些約束的邏輯,比如可以約束 midDate 的日期在 maxDate 之前等。如果你添加了這些邏輯,通過 normalize()的value將會被解析。
Value 生命周期

<h2 id="api">API</h2>
限于篇幅問題,在此只列舉每一種api常用的使用方法,具體請移步官方API文檔
<h4 id="redux-form">API:reduxForm(config:Object)</h4>
通過配置一些參數創建一個可以讓你配置你的表單的修飾器。諸如配置如何做表單驗證、提交成功或失敗的回調、獲取或失去焦點的action發送、prop命名空間等,具體例子會在之后的demo中介紹。
Importing
var reduxForm = require('redux-form').reduxForm;  // ES5

import { reduxForm } from 'redux-form';  // ES6
常用參數介紹
必要參數
-
form : String[required]: 用于命名您的表單,在store生成此命名的數據節點。
可選參數
-
onChange : Function [optional]: 表單觸發 onChange 事件后的回調。 -
onSubmit : Function [optional[: 表單提交配置,可以配置需要提交哪些參數,還有提交時觸發的dispatch等。 -
onSubmitSuccess : Function [optional]&onSubmitFail : Function [optional]: 提交表單成功和失敗的回調。 -
shouldValidate(params) : boolean [optional]: 同步驗證。 -
shouldAsyncValidate(params) : boolean [optional]: 異步驗證。 -
touchOnBlur : boolean [optional]&touchOnChange : boolean [optional]: 標識onBlur或onChange的觸發。
<h4 id="props">API:props</h4>
列出全部當前頁面由 redux-form 生成用于修飾此表單組件的props。
如果你希望用嚴格模式來編寫 PropTypes, redux-form 會導出此處所有的 propTypes,你需要引用他們并可以添加自己的propTypes,像這樣:
import {reduxForm, propTypes} from 'redux-form';

class SimpleForm extends Component {
  static propTypes = {
    ...propTypes,
    // other props you might be using
  }
  // ...
}
常用屬性
-
pristine:true表示表單數據為原始數據沒被修改過,反之為dirty。 -
submitting: 用于表示您的表單提交狀態,他只會在您的表單提交后返回一個promise對象時起作用。false表示promise對象為resolved或rejected狀態。 -
handleSubmit(eventOrSubmit) : Function: 提交表單的函數,如果表單需要驗證,驗證方法會被執行(包括同步和異步)。調用方法有兩種:- 組件內部直接調用
<form onSubmit={handleSubmit}> - 賦值給prop外部調用
<MyDecoratedForm onSubmit={data => {//do something with data.}}/>
- 組件內部直接調用
<h4 id="Field">API:Field</h4>
所有您需要與 store 數據連接的表單組件,都可以用 <Field/>。在正確使用它之前,有三條基本概念您需要了解清楚:
- 必須包含
name屬性。可以是簡單的字符串,如userName、password,也可以是復雜的結構,如contact.billing.address[2].phones[1].areaCode。 - 必須包含
component屬性。可以是一個組件、無狀態組件或者DOM所支持的默認的標簽(input、textarea、select)。 - 其他所有屬性會通過prop傳遞到元素生成器中。如
className
Importing
var Field = require('redux-form').Field;  // ES5

import { Field } from 'redux-form';  // ES6
使用方法
1.組件
可以是任何自定義的 class 組件活著其他第三方庫。
// MyCustomInput.js
import React, { Component } from 'react'

class MyCustomInput extends Component {
  render() {
    const { input: { value, onChange } } = this.props
    return (
      <div>
        <span>The current value is {value}.</span>
        <button type="button" onClick={() => onChange(value + 1)}>Inc</button>
        <button type="button" onClick={() => onChange(value - 1)}>Dec</button>
      </div>
    )
  }
}
然后這樣使用:
import MyCustomInput from './MyCustomInput'

...

<Field name="myField" component={MyCustomInput}/>
2.無狀態組件
這是一個非常靈活的使用 <Field/> 的方法,使用方法和 redux-form 的前一個版本很相似。但必須在你的 render() 方法外定義它,否則它每次渲染都會被重建,并且由于組件的 prop 會變,就會強制 <Field/> 進行渲染。如果你在 render() 內部定義無狀態組件,不但會拖慢你的app,而且組件的input每次都會在組件重新渲染的時候失去焦點。
// outside your render() method
const renderField = (field) => (
    <div className="input-row">
      <input {...field.input} type="text"/>
      {field.meta.touched && field.meta.error &&
       <span className="error">{field.meta.error}</span>}
    </div>
  )

// inside your render() method
<Field name="myField" component={renderField}/>
3.string: input, select, or textarea
比如創建一個文字輸入框組件
<Field component="input" type="text"/>
<h4 id="Fields">API:Fields</h4>
與 Field 相似,但是它同時使用多個fields。<Fields/> 在 name 屬性中使用一組表單name的數組,而不是用單一一個 name 屬性來表示。
重要: 請節制使用 <Fields/>,其內部任何表單組件數據變化時,都會重新渲染整個 <Fields/>。因此會成為您app的性能瓶頸。除非你真的需要這么做,最好還是用 <Field/> 來一個個自定義您的表單組件
Importing
var Fields = require('redux-form').Fields;  // ES5

import { Fields } from 'redux-form';  // ES6
使用方法
與 <Field/> 差不多,有2種使用方式,組件與無狀態組件,這里不詳細介紹。
<h4 id="FieldArray"> API:FieldArray </h4>
這個組件可以讓你定義一系列的表單,它的工作原理和 <Field/> 一樣。通過 <Field/>,給它一個 name,就可以映射到 Redux state中的指定位置。組件也可以通過連接到 Redux state 的 props 進行渲染。
通過 <FieldArray/> ,你也需要和 <Field/> 一樣給它一個 name。而你注入 <FieldArray/> 的組件會通過字段數組收到一系列的 props,用以查詢、更新和迭代。
Importing
var FieldArray = require('redux-form').FieldArray;  // ES5

import { FieldArray } from 'redux-form';  // ES6
使用方法
后面Demo里會具體介紹
<h4 id="Form"> API:Form </h4>
Form 組件對React的form組件進行了簡單的封裝,用以觸發用 redux-form 修飾的組件的 onSubmit 函數。
您可以在以下場景中使用它:
- 在您表單組件內部,可以通過
onSubmit={this.props.handleSubmit(this.mySubmitFunction)}執行您的提交。 - 或者
- 通過 submit() Instance API來啟動您的提交內容。(即,在引用您的表單組件的地方直接調用)
- 通過
dispatch一個action的方式啟動調用。請參考 Remote Submit Example
如果您只是將 onSubmit 函數作為你的配置或屬性,那么你不需要用到這個組件。
Importing
var Form = require('redux-form').Form;  // ES5

import { Form } from 'redux-form';  // ES6
使用方法
只需要將您組件中所有 <form> 替換成 <Form> 即可。
<h4 id="FormSection"> API:FormSection </h4>
FormSection 可以很簡單地將現有的表單組件分割成更小的組件,用以在復雜的表單中進行復用。它是通過明確規定好的 Field、Fields和FieldArray字組件 name的前綴來完成此功能的。
使用方法
這個例子所描述的業務是一個購買人與收件人視角的訂單用戶信息表單結構。購買人與收件人擁有相同的字段結構,因此把這個部分拆分成一個名為 Party 的組件是有意義的。假設現在 Party 包含 givenName middleName surname address 這幾個字段,然后將 address 部分再度拆分成可重用的組件 Address。代碼如下:
//Address.js
class Address extends Component {
    render() {
        return <div>
            <Field name="streetName" component="input" type="text"/>
            <Field name="number" component="input" type="text"/>
            <Field name="zipCode" component="input" type="text"/>
        </div>
    }
}

//Party.js
class Party extends Component {
    render() {
        return <div>
            <Field name="givenName" component="input" type="text"/>
            <Field name="middleName" component="input" type="text"/>
            <Field name="surname" component="input" type="text"/>
            <FormSection name="address">
                <Address/>
            </FormSection>
        </div>
    }
}

//OrderForm.js
class OrderForm extends Component {
    render() {
        return <form onsubmit={...}>
            <FormSection name="buyer">
                <Party/>
            </FormSection>
            <FormSection name="recipient">
                <Party/>
            </FormSection>
        </form>
    }
}
//don't forget to connect OrderForm with reduxForm()
字段完整的名字最后將變成如 buyer.address.streetName 的形式,結果結構如下:
{
    "buyer": {
        "givenName": "xxx",
        "middleName": "yyy",
        "surname": "zzz",
        "address": {
            "streetName": undefined,
            "number": "123",
            "zipCode": "9090"
        }
    },
    "recipient": {
        "givenName": "aaa",
        "middleName": "bbb",
        "surname": "ccc",
        "address": {
            "streetName": "foo",
            "number": "4123",
            "zipCode": "78320"
        }
    }
}
類似 Address 的組件很少更改它的 name,為了使組件繼承 FormSection 而不是 Component,需要設置一個默認的 name 如下:
class Address extends FormSection {
    //ES2015 syntax with babel transform-class-properties
    static defaultProps = {
        name: "address"
    }
    render() {
        return <div>
            <Field name="streetName" component="input" type="text"/>
            <Field name="number" component="input" type="text"/>
            <Field name="zipCode" component="input" type="text"/>
        </div>
    }
}
//Regular syntax:
/*
Address.defaultProps = {
    name: "address"
}
*/
<h4 id="formValues"> API:formValues() </h4>
作為一個修飾,可以讀取當前表單的 value。當表單子組件的 onChange 依賴于當前表單里的值,很有用。
Importing
var formValues = require('redux-form').formValues;  // ES5

import { formValues } from 'redux-form';  // ES6
使用方法
const ItemList = formValues('withVat')(MyItemizedList)

const ItemList = formValues({showVat: 'withVat'})(MyItemizedList)
這些裝飾組件現在分別擁有了 withVat與showVat的 props。
<h4 id="formValueSelector"> API:formValueSelector() </h4>
formValueSelector 的API可以很方便的 connect() state的值到表單的 value 里。它可以通過表單的 name 為你的表單創建一個 value 拾取器。
Importing
var formValueSelector = require('redux-form').formValueSelector;  // ES5

import { formValueSelector } from 'redux-form';  // ES6
使用方法
首先需要按照你表單的 name 創建一個 selector。
const selector = formValueSelector('myFormName')
然后有幾種方法使用 selector:
1.拾取個別的字段
connect(
  state => ({
    firstValue: selector(state, 'first'),
    secondValue: selector(state, 'second')
  })
)(MyFormComponent)
2.在分好組的 prop 中按組的方式拾取多個字段
connect(
  state => ({
    myValues: selector(state, 'first', 'second')
  })
)(MyFormComponent)
3.把 selector 當作 mapStateToProps 來使用
如果你不需要 state 中其他的屬性值,selector作為mapStateToProps可以自動完成這個工作。
connect(
  state => selector(state, 'first', 'second')
)(MyFormComponent)
<h4 id="reducer"> API:reducer </h4>
表單的reducer用來安裝您的 Redux state 到您的表單中。
如果您使用 Immutablejs 來管理您的 Redux state,你必須這么從 redux-form/immutable 中導入 reducer 模塊。
ES5例子
var redux = require('redux');
var formReducer = require('redux-form').reducer;
// Or with Immutablejs:
// var formReducer = require('redux-form/immutable').reducer;

var reducers = {
  // ... your other reducers here ...
  form: formReducer
};
var reducer = redux.combineReducers(reducers);
var store = redux.createStore(reducer);
ES6例子
import { createStore, combineReducers } from 'redux';
import { reducer as formReducer } from 'redux-form';
// Or with Immutablejs:
// import { reducer as formReducer } from 'redux-form/immutable';

const reducers = {
  // ... your other reducers here ...
  form: formReducer
};
const reducer = combineReducers(reducers);
const store = createStore(reducer);
<h4 id="reducer.plugin"> API:reducer.plugin </h4>
表單中返回一個通過附加指定功能 reducers 用以接受 action 的reducer。 它的參數應該是一個能映射 formName和一個(state, action) => nextState reducer 關系的一個對象。通過每一個 reducer的state只能是屬于那個表單的一個片段。
說明
flux 體系中最美的一部分應該是所有 reducers(或者 Flux中的標準術語 stores)可以接受所有 actions,他們可以修改基于這些 action來修改數據。舉個例子,你有一個登錄的表單,當你提交失敗的時候,你想清楚密碼輸入框內的數據,哪怕你的登錄的提交信息是屬于另一個 reducer/actions體系,你的表單依然可以做出自己的響應。
而不是使用 redux-form 中一個普通的 reducer,你可以通過調用 plugin() 函數來加強你的 reducer。
注:這是一個加強功能的操作用來修改你內部的 redux-form state的片段,如果你不小心使用,會把事情搞砸。
例子
下面這個例子的作用是,當 AUTH_LOGIN_FAIL 的 action 被分發時,可以清除登錄表單里的密碼輸入框:
import { createStore, combineReducers } from 'redux'
import { reducer as formReducer } from 'redux-form'
import { AUTH_LOGIN_FAIL } from '../actions/actionTypes'

const reducers = {
  // ... your other reducers here ...
  form: formReducer.plugin({
    login: (state, action) => {   // <----- 'login' is name of form given to reduxForm()
      switch(action.type) {
        case AUTH_LOGIN_FAIL:
          return {
            ...state,
            values: {
              ...state.values,
              password: undefined // <----- clear password value
            },
            fields: {
              ...state.fields,
              password: undefined // <----- clear field state, too (touched, etc.)
            }
          }
        default:
          return state
      }
    }
  })
}
const reducer = combineReducers(reducers)
const store = createStore(reducer)
<h4 id="SubmissionError"> API: SubmissionError </h4>
這個 throwable error 用于從 onSubmit 返回一個表單驗證錯誤信息。目的是用來區分 promise 失敗的原因究竟是驗證錯誤、AJAX I/O錯誤還是其他服務器錯誤。如果它是由于表單里 { field1: 'error', field2: 'error' }產生的錯誤,那這個錯誤將會被添加到每一個標記過錯誤屬性的字段里,就像異步表單驗證錯誤一樣。如果有一個錯誤沒有指定的字段,但是應用到了整個表單,你需要繼續傳遞它,就好像是某個字段調用的 _error一樣,然后他會給出一個錯誤的屬性。(就是不管他往外拋)
Importing
var SubmissionError = require('redux-form').SubmissionError;  // ES5

import { SubmissionError } from 'redux-form';  // ES6
使用方法
<MyForm onSubmit={values =>
  ajax.send(values) // however you send data to your server...
    .catch(error => {
      // how you pass server-side validation errors back is up to you
      if(error.validationErrors) {
        throw new SubmissionError(error.validationErrors)
      } else {
        // what you do about other communication errors is up to you
      }
    })
}/>
<h4 id="Action-Creators"> API: Action Creators </h4>
redux-form 對外開放了所有的內部 action creators,允許你按找你的意愿來完成對分發 action 的控制。進而,官方推薦您在完成您大部分需求的時候,對于那些表單里指定需求的字段的 action來說,當作這些 action 已經綁定到 dispatch一樣,直接將這些 action 通過 props 傳遞。
具體 action 請參考官方文檔。
<h4 id="Selectors"> API: Selectors </h4>
redux-form 提供了一系列有用的 Redux state 拾取器,可以在app的任何地方任何表單內拾取 state 上的數據。
下列所有拾取器擁有統一的使用方法: 他們都(除了getFormNames)使用表單的名字,來創建一個拾取器,無論表單的 state是什么。
import {
  getFormValues,
  getFormInitialValues,
  getFormSyncErrors,
  getFormMeta,
  getFormAsyncErrors,
  getFormSyncWarnings,
  getFormSubmitErrors,
  getFormNames,
  isDirty,
  isPristine,
  isValid,
  isInvalid,
  isSubmitting,
  hasSubmitSucceeded,
  hasSubmitFailed
} from 'redux-form'

MyComponent = connect(
  state => ({
    values: getFormValues('myForm')(state),
    initialValues: getFormInitialValues('myForm')(state),
    syncErrors: getFormSyncErrors('myForm')(state),
    fields: getFormMeta('myForm')(state),
    asyncErrors: getFormAsyncErrors('myForm')(state),
    syncWarnings: getFormSyncWarnings('myForm')(state),
    submitErrors: getFormSubmitErrors('myForm')(state),
    names: getFormNames('myForm')(state),
    dirty: isDirty('myForm')(state),
    pristine: isPristine('myForm')(state),
    valid: isValid('myForm')(state),
    invalid: isInvalid('myForm')(state),
    submitting: isSubmitting('myForm')(state),
    submitSucceeded: hasSubmitSucceeded('myForm')(state),
    submitFailed: hasSubmitFailed('myForm')(state)
  })
)(MyComponent)
<h2 id="Examples">Examples</h2>
<h3 id="Simple"> Demo: Simple Form </h3>
這個例子把表單所有基本的元素都列了出來,和官方Demo有所區別的是,增加了2個 type 為 file 的 Field (直接在 Field 中使用 file 的類型會有點問題),一個是使用了jQuery的 dropify 編寫的上傳單個文件的組件 MyDropify,一個是使用了 dropzone 編寫的上傳多個文件的組件 MyDropzone (在這里使用了 react-dropzone 和 redux-form 的組合)。官方的例子不單獨介紹了,主要貼一下兩個自定義 Field。
注:由于reducer設計之初是純函數,而提交文件的表單最后取得的值是一個 file 對象,當您使用了 redux-immutable-state-invariant 之類的檢測工具,對其中諸如 lastModifiedDate 的值會報錯,具體請看。在此,我們暫時先不考慮immutable的問題。
Simple路徑
src/components/demo/simple/
MyDropify
src/components/utils/MyDropify.js
代碼:
import React, { Component } from 'react';
const $ = window.$;
require('dropify');

class MyDropify extends Component {
  componentDidMount(){
    $('.dropify').dropify();
  }
  render() {
    const { input,dataAllowedFileExtensions } = this.props
    const onAttachmentChange = (e) => {
        e.preventDefault();
        const files = [...e.target.files];
        input.onChange(files);
    };
    return (
      <div>
        <input type="file"
               onChange={onAttachmentChange}
               className="dropify"
               data-allowed-file-extensions={dataAllowedFileExtensions} />
      </div>
    )
  }
}

export default MyDropify;
使用方法:
  <div className="form-group">
    <div className="input-group">
      <label>Dropify</label>
      <Field component={MyDropify}
             name="inputfile1"
             dataAllowedFileExtensions="doc docx txt pdf xls xlsx jpg png bmp"></Field>
    </div>
  </div>
dropify 的具體用法請參考其官方文檔。
MyDropzone
src/components/utils/MyDropify.js
代碼:
import React, { Component } from 'react';
import Dropzone from 'react-dropzone';
class MyDropzone extends Component {
  render() {
    const { input,desc,accept } = this.props
    const onDrop = (files) => {
        input.onChange(files);
    };
    return (
      <Dropzone onDrop={onDrop} accept={accept}>
        {({ isDragActive, isDragReject, acceptedFiles, rejectedFiles }) => {
           if (isDragActive) {
             return "This file is authorized";
          }
           if (isDragReject) {
             return "This file is not authorized";
          }
           return acceptedFiles.length || rejectedFiles.length
             ? `Accepted ${acceptedFiles.length}, rejected ${rejectedFiles.length} files`
            : desc;
        }}
      </Dropzone>
    )
  }
}

export default MyDropzone;
使用方法:
  <div className="form-group">
    <div className="input-group">
      <label>Dropzone</label>
      <Field component={MyDropzone}
             name="inputfile2"
             desc="My Dropzone"
             accept="image/png,image/jpeg"></Field>
    </div>
  </div>
react-dropzone 和jQuery版本的有所區別,使用過 dropzone 的應該都知道選擇文件可以渲染到框體內,react版本的 dropzone 原聲不帶這個功能,但它提供了詳盡的方法可以自己實現很多功能,比如選擇完文件可以渲染到組件中,有時間我再完善此功能。
<h3 id="snycValidation"> Demo: Sync Validation </h3>
同步的表單驗證,包括了錯誤和警告型配置。官方Demo中只演示了輸入框的驗證,而這里準備了包括 radio select textarea 的驗證方式(checkbox 我會在單獨的一章講解),調用方法可以參見本文的源代碼。
Sync Validation路徑
src/components/demo/syncValidation/
radioField
src/components/utils/validation/radioField.js
import React from 'react';

const inputField = ({
  input,
  label,
  type,
  meta: { touched, error, warning }
}) => (
  <div className={touched && error ? 'has-error form-group':'form-group'}>
    <div className="input-group">
      <span className="input-group-addon">{label}</span>
      <input {...input} placeholder={label} type={type} className="form-control"/>
    </div>
    {touched &&
      ((error && <div className="help-block with-errors">{error}</div>) ||
        (warning && <div className="help-block with-errors">{warning}</div>))}
  </div>
)

export default inputField;
selectField
src/components/utils/validation/selectField.js
import React from 'react';
const selectField = ({
  input,
  label,
  selects,
  meta: { touched, error, warning }
}) => (
  <div className={touched && error ? 'has-error form-group':'form-group'}>
    <div className="input-group">
      <span className="input-group-addon">{label}</span>
      <select {...input} className="form-control">
        {
          selects.map((item, i) => (
            <option key={i} value={item.value}>{item.text}</option>
          ))
        }
      </select>
    </div>
    {touched &&
      ((error && <div className="help-block with-errors">{error}</div>) ||
        (warning && <div className="help-block with-errors">{warning}</div>))}
  </div>
)

export default selectField;
textareaField
src/components/utils/validation/textareaField.js
import React from 'react';

const textareaField = ({
  input,
  label,
  type,
  cols,
  rows,
  meta: { touched, error, warning }
}) => (
  <div className={touched && error ? 'has-error form-group':'form-group'}>
    <label>{label}</label>
    <textarea {...input} cols={cols} rows={rows} className="form-control"></textarea>
    {touched &&
      ((error && <div className="help-block with-errors">{error}</div>) ||
        (warning && <div className="help-block with-errors">{warning}</div>))}
  </div>
)

export default textareaField;
<h3 id="FieldLevelValidation"> Demo: Field-Level Validation </h3>
除了提供一個驗證方法一起驗證表單里的值這種方法之外,還可以對每一個 <Field/> 或 <FieldArray/> 分別做驗證。官方給的Demo已經足夠說明問題了,在這里只針對上面的 Sync Validation 作簡單的改寫。具體請看代碼。
<h3 id="SubmitValidation"> Demo: Submit Validation </h3>
一種服務器表單驗證較好的方法是在調用 onSubnit 之后返回一個 rejected 的 promise 對象。當您的表單被提交時,有2種方法提供給 redux-form 這個函數。
- 把他當作一個
onSubmit的prop傳遞給您的裝飾組件。那樣的話,你可以在您的裝飾組件中使用onSubmit={this.props.handleSubmit}確保當用戶點擊提交按鈕的時候觸發這個函數。 - 把他當作一個參數傳遞給您裝飾組件內的
this.props.handleSubmit函數。這種情況下,你需要使用onClick={this.props.handleSubmit(mySubmit)}來確保當用戶點擊提交按鈕的時候觸發這個函數。
這個錯誤信息的顯示方式和同步驗證(Synchronous Validation)后的錯誤信息一樣,但他是通過 onSubmit 函數返回一個封裝過的 SubmissionError 對象。這個驗證錯誤就像HTTP的400或500錯誤一樣,和I/O錯誤是有區別的,并且他還會是這個提交的 promise 對象的狀態置為 rejected。
DEMO中沒什么花頭,和官方一樣,就是基于 SyncValidation 把表單驗證的邏輯放在了提交后的邏輯中,并拋出了一個 SubmissionError。
<h3 id="AsyncValidation"> Demo: Async Validation </h3>
服務器表單驗證的方式比較推薦使用Submit Validation,但是可能存在當您填寫表單的時候,同時需要服務器端來驗證。有一個經典的例子是當一個用戶選取一個值,比如用戶名,它必須是您系統中唯一的一個值。
為了寫一個異步的表單驗證,需要給 redux-form 提供一個異步驗證的函數(asyncValidation)用來提供一個可以從表單獲取數據的一個對象,然后 Redux 分發這個函數,返回一個狀態為擁有一個錯誤對象的 rejects或狀態為 reslove 的 promise 對象。
您需要同時指定某幾個字段,通過 asyncBlurFields 的屬性配置,來標記是否需要在他們失去焦點的時候觸發這個異步驗證。
重要
- 異步驗證會在
onSubmit之前被調用,所以如果你關心的是onSubmit驗證,你需要使用 Submit Validation - 當一個字段的同步驗證錯誤時,那它的失去焦點的時候將不會觸發異步驗證。
Demo中的自定義 <Field/> 的 meta 中有一個 asyncValidating,來標識異步驗證的 promise 對象的 Pending 狀態。
<h3 id="initializeFromState"> Demo: Initialize From State </h3>
通過 initialValues 屬性或 reduxForm() 配置的參數所提供的數據,被加載到表單 state 中,并且把這些初始化數據作為原始數據(pristine)。當 reset() 觸發的時候,也會返回這些值。除了保存這些 pristine 值,初始化您表單的這個操作也會替換表單里已經存在的值。
在許多應用中,這些值可能是來自服務器并且儲存在其他 reducer 中的。想要得到這些值,你需要使用 connect() 去自己鏈接 state 然后映射這些數據到您的 initialValues 屬性里。
默認情況下,你只需要通過 initialValues 初始化您的表單組件一次即可。目前有2種方法可以通過新的 pristine 值重新初始化表單。
- 傳遞一個
enableReinitialize屬性或配置reduxForm()中的參數為true就可以讓表單在每次initialValues屬性變化的時候重新初始化,生成一個新的pristine值。如果想要在重新初始化的時候保持已改變過的表單的值,可以設置keepDirtyOnReinitialize為true。默認情況下,重新初始化會將pristine值替換掉已改變過的表單的值。 - 發出一個
INITIALIZEaction(用redux-formaction生成器生成)。
此Demo較之官方Demo,增加了 enableReinitialize 和 keepDirtyOnReinitialize 的用法。以下是代碼片段。
InitializeFromStateForm = reduxForm({
  form: 'initializeFromState',// a unique identifier for this form
  enableReinitialize:true,
  keepDirtyOnReinitialize:true,// 這個值表示重新初始化表單后,不替換已更改的值,可以用clear來測試
})(InitializeFromStateForm)
<h3 id="selectingFormValues"> Demo: Selecting Form Values </h3>
有時候您希望訪問表單組件中某些字段的值,你需要在 store 中直接 connect() 表單的值。在一般的使用情況下,redux-form 通過 formValueSelector 提供了一個方便的選擇器。
警告: 需要節制使用這個機制,因為這樣的話,表單里的某一個值一旦發生改變,就會重新渲染您的組件。
代碼片段:
// Decorate with reduxForm(). It will read the initialValues prop provided by connect()
SelectingFormValuesForm = reduxForm({
  form: 'selectingFormValues',// a unique identifier for this form
})(SelectingFormValuesForm)

// Decorate with connect to read form values
const selector = formValueSelector('selectingFormValues') // <-- same as form name
SelectingFormValuesForm = connect(state => {
  // can select values individually
  const hasEmailValue = selector(state, 'hasEmail')
  const favoriteColorValue = selector(state, 'favoriteColor')
  // or together as a group
  const { firstName, lastName } = selector(state, 'firstName', 'lastName')
  return {
    hasEmailValue,
    favoriteColorValue,
    fullName: `${firstName || ''} ${lastName || ''}`
  }
})(SelectingFormValuesForm)

export default SelectingFormValuesForm
<h3 id="demofieldArray"> Demo: Field Array </h3>
這個例子展示了怎樣構建一個字段組,包括擁有一個字段的和擁有一組字段的字段組。在這個表單里,每一個俱樂部的成員都有姓和名,還有一個興趣的列表。以下這些數組的操作 insert, pop, push, remove, shift, swap, unshift 行為是被允許的:(更多詳細的內容可以參考FieldArray Docs)
- 一個
action的原始構造 - 通過您表單的
this.props.array對象綁定的action - 同時綁定表單和通過
FieldArray組件獲得的對象上的數組的action
<h3 id="remoteSubmit"> Demo: Remote Submit </h3>
這個例子演示了一個表單如何從一個無關的組件或中間件中發送的一個 SUBMIT 的action來執行提交邏輯。
這個例子里你所看到的的提交按鈕,不是直接與表單組件直接鏈接的,它的作用只是通過 Redux 發送的一個提交的 action。
要注意它的工作方式,這個提交函數必須通過 reduxForm() 配置參數的傳遞或通過 prop 提供給表單組件。以下是發送這個action的方式:
import React from 'react'
import { connect } from 'react-redux'
import { submit } from 'redux-form'

const style = {
  padding: '10px 20px',
  width: 140,
  display: 'block',
  margin: '20px auto',
  fontSize: '16px'
}

const RemoteSubmitButton = ({ dispatch }) => (
  <button
    type="button"
    style={style}
    onClick={() => dispatch(submit('remoteSubmit'))}
  >
    Submit
  </button>
)
//   remoteSubmit 為表單的名字
export default connect()(RemoteSubmitButton)
<h3 id="normalizing"> Demo: Field Normalizing </h3>
當您需要在用戶輸入和 store 中的數據之間施加某些控制,你可以使用 normalizer。normalizer 就是一個每當值改變是,可以在保存到 store 之前進行某些轉換的一個函數。
一個常用的例子:你需要一個某些經過格式化的值,比如電話號碼或信用卡號。
Normalizers 傳遞了4個參數:
-
value- 你設置了normalizer字段的值 -
previousValue- 這個值最近一次變化之前的一個值 -
allValues- 表單中,所有字段當前的值 -
previousAllValues- 表單中,所有字段在最近一次變化前的值
這些可以使你基于表單中另外一個字段而限制某個特定的字段。比如例子中的字段最小最大值:這里你不能設置 min 中的值比 max 中的值大,不能設置 max 中的值比 min 的值更小(下面有代碼)
const upper = value => value && value.toUpperCase()
const lower = value => value && value.toLowerCase()
const lessThan = otherField => (value, previousValue, allValues) =>
  parseFloat(value) < parseFloat(allValues[otherField]) ? value : previousValue
const greaterThan = otherField => (value, previousValue, allValues) =>
  parseFloat(value) > parseFloat(allValues[otherField]) ? value : previousValue
下面是對電話號碼處理的邏輯
const normalizePhone = value => {
  if (!value) {
    return value
  }

  const onlyNums = value.replace(/[^\d]/g, '')
  if (onlyNums.length <= 3) {
    return onlyNums
  }
  if (onlyNums.length <= 7) {
    return `${onlyNums.slice(0, 3)}-${onlyNums.slice(3)}`
  }
  return `${onlyNums.slice(0, 3)}-${onlyNums.slice(3, 6)}-${onlyNums.slice(6, 10)}`
}
<h3 id="Wizard"> Demo: Wizard </h3>
一種常見的UI設計模式是把一個單一的表單分割成幾組分開的表單形式,最為熟知的就是 Wizard。使用 redux-form 的話有好多方式可以來做這種設計,但最簡單和最推薦的方式是遵循一下幾種指示:
- 把每一個頁面都用同一個表單名字連接到
reduxForm() - 指定
destroyOnUnmount為false就可以在表單組件卸載的時候保存表單數據 - 你可以為整個表單指定一個同步驗證函數
- 使用
onSubmit來觸發進入下一步,因為它強制運行驗證函數
需要由你自己來實現的:
- 在提交成功之后手動調用
props.destory()
例子里的代碼主要列出控制 Wizard 的組件,其他組件的用法已被我們熟知。
import React, { Component } from 'react'
import PropTypes from 'prop-types'
import WizardFormFirstPage from './WizardFormFirstPage'
import WizardFormSecondPage from './WizardFormSecondPage'
import WizardFormThirdPage from './WizardFormThirdPage'

class WizardForm extends Component {
  constructor(props) {
    super(props)
    this.nextPage = this.nextPage.bind(this)
    this.previousPage = this.previousPage.bind(this)
    this.state = {
      page: 1
    }
  }
  nextPage() {
    this.setState({ page: this.state.page + 1 })
  }

  previousPage() {
    this.setState({ page: this.state.page - 1 })
  }

  render() {
    const { onSubmit } = this.props
    const { page } = this.state
    return (
      <div>
        {page === 1 && <WizardFormFirstPage onSubmit={this.nextPage} />}
        {page === 2 &&
          <WizardFormSecondPage
            previousPage={this.previousPage}
            onSubmit={this.nextPage}
          />}
        {page === 3 &&
          <WizardFormThirdPage
            previousPage={this.previousPage}
            onSubmit={onSubmit}
          />}
      </div>
    )
  }
}

WizardForm.propTypes = {
  onSubmit: PropTypes.func.isRequired
}

export default WizardForm
