前言
iOS里的UI控件其實沒有幾個,界面基本就是圍繞那么幾個控件靈活展開,最難的應(yīng)屬UICollectionView了,因為它的可定制化程度最高,最靈活,值得我們?nèi)パ芯恳环?/p>
目錄
- ** UICollectionView的基本使用**
- ** 自定義布局整體思路**
- 實現(xiàn)瀑布流
- ** 每頁多個Cell的水平滾動布局**
- 實現(xiàn)CoverFlow效果
- 輪轉(zhuǎn)卡片
- 模仿今日頭條實現(xiàn)Cell重排
- iOS9用系統(tǒng)屬性實現(xiàn)Cell重排
- iOS10后UICollectionView的優(yōu)化與預(yù)加載
1.UICollectionView的基本使用
- 創(chuàng)建UICollectionFlowLayout對象
- 根據(jù)flowlayout創(chuàng)建UICollectionView的對象
- 注冊cell或頭尾部視圖
- 遵守協(xié)議
創(chuàng)建UICollectionFlowLayout對象
itemSizecell的大小scrollDirection滾動方向minimumInteritemSpacing與滾動方向相反的兩個item之間最小距離,默認為10,它會根據(jù)你設(shè)定的這個值加上item的大小,來查看能一行最多能放多少個item,再把確定的item鋪滿總行,左右不留間隙,每個item之間的距離可能會比這個值大-
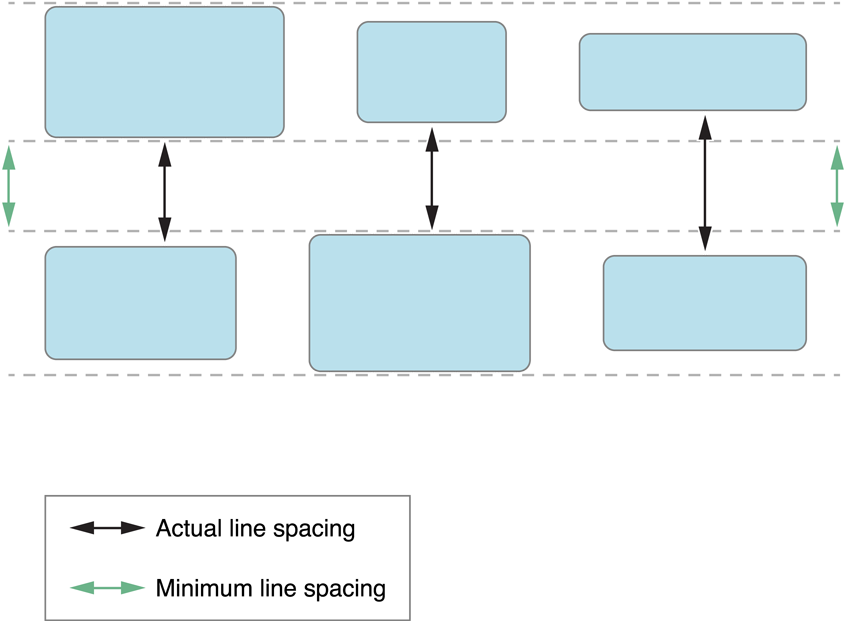
minimumLineSpacing滾動方向上item的間距,如果你的是水平滾動,留心水平間距別誤設(shè)為minimumInteritemSpacing,筆者就上過這樣的當,默認為10,在有規(guī)律的item之間嚴格按照設(shè)定的距離來,但是在無規(guī)律的item之間,就是每行item的最小距離,如下圖綠色箭頭所示
 minimumLineSpacing
 -
sectionInset每組的內(nèi)切距,默認都為0,item會根據(jù)它來鋪滿總行,如下圖所示
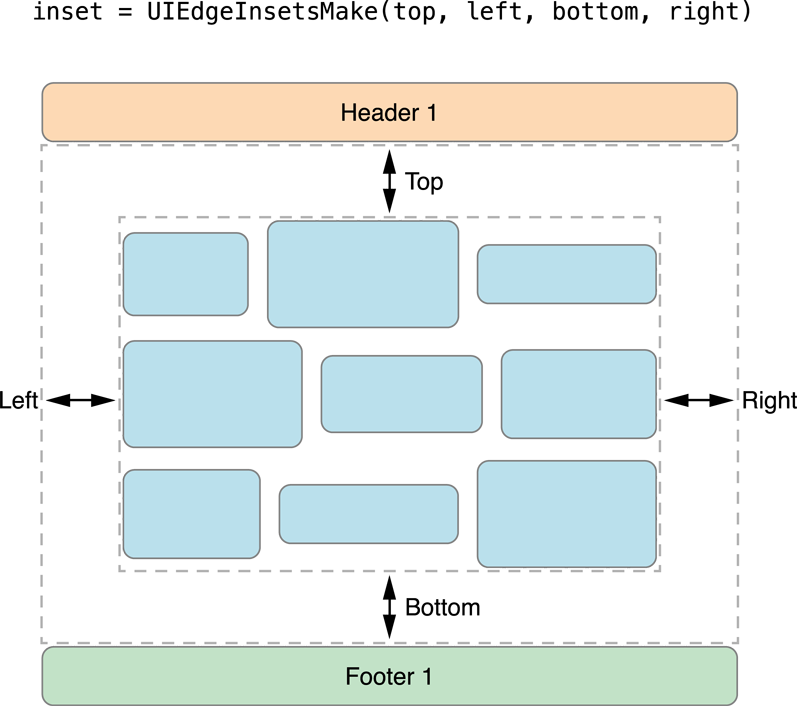 sectionInset
 headerReferenceSizefooterReferenceSize每組的頭部視圖和尾部視圖的大小sectionHeadersPinToVisibleBoundssectionHeadersPinToVisibleBoundsiOS 9.0 以后新特性,滾動時,每組的頭部視圖或尾部視圖是否固定在頭部或者尾部如果你的layout對象屬性不是固定的,你需要實現(xiàn)
UICollectionViewDelegateFlowLayout協(xié)議里相應(yīng)屬性的數(shù)據(jù)源方法
    let layout = UICollectionViewFlowLayout()
    let margin: CGFloat = 8
    let itemW = (view.bounds.width - margin * 4) / 3
    let itemH = itemW
    // 每個item的大小
    layout.itemSize = CGSize(width: itemW, height: itemH)
    // 最小行間距
    layout.minimumLineSpacing = margin
    // 最小item之間的距離
    layout.minimumInteritemSpacing = margin
    // 每組item的邊緣切距
    layout.sectionInset = UIEdgeInsetsMake(0, margin, 0, margin)
    // 滾動方向
    layout.scrollDirection = .vertical
    // 創(chuàng)建collection
    let collectionView = UICollectionView(frame: view.bounds, collectionViewLayout: layout)
    // 遵守協(xié)議
    collectionView.delegate = self
    collectionView.dataSource = sel
注冊cell和頭尾部視圖
- 使用
registerClass:forCellWithReuseIdentifier:或者registerNib:forCellWithReuseIdentifier:注冊cell - 使用
registerClass:forSupplementaryViewOfKind:withReuseIdentifier:或者registerNib:forSupplementaryViewOfKind:withReuseIdentifier:注冊頭尾部視圖,kind類型有UICollectionElementKindSectionHeader和UICollectionElementKindSectionFooter - 自定義頭尾部視圖必須繼承
UICollectionReusableView,其實UICollectionViewCell也是繼承自它
    // 注冊cell
    collectionView.register(BaseCollectionViewCell.self, forCellWithReuseIdentifier: baseCellID)

    // 注冊頭尾部視圖,它們必須繼承自UICollectionReuseView
    collectionView.register(UINib(nibName: "BaseHeaderAndFooterCollectionReusableView", bundle: nil), forSupplementaryViewOfKind: UICollectionElementKindSectionHeader, withReuseIdentifier: baseReuseHeaderID)
    collectionView.register(UINib(nibName: "BaseHeaderAndFooterCollectionReusableView", bundle: nil), forSupplementaryViewOfKind: UICollectionElementKindSectionFooter, withReuseIdentifier: baseReuseFooterID)
遵循數(shù)據(jù)源協(xié)議
-
numberOfSections(in:)方法里 返回組數(shù) -
collectionView(_:numberOfItemsInSection)返回每組個數(shù) -
collectionView(_:cellForItemAt:)和collectionView(_:viewForSupplementaryElementOfKind:at:)編輯你的cell和頭尾部視圖
   func numberOfSections(in collectionView: UICollectionView) -> Int {
       return 3
   }

   func collectionView(_ collectionView: UICollectionView, numberOfItemsInSection section: Int) -> Int {
       return 10 + section * 3
   }

   func collectionView(_ collectionView: UICollectionView, cellForItemAt indexPath: IndexPath) -> UICollectionViewCell {
       let cell = collectionView.dequeueReusableCell(withReuseIdentifier: baseCellID, for: indexPath) as! BaseCollectionViewCell
       cell.cellIndex = indexPath.item
       return cell
   }

   // 頭尾部的數(shù)據(jù)源協(xié)議
   func collectionView(_ collectionView: UICollectionView, viewForSupplementaryElementOfKind kind: String, at indexPath: IndexPath) -> UICollectionReusableView {
       if kind == UICollectionElementKindSectionHeader {
           let header = collectionView.dequeueReusableSupplementaryView(ofKind: UICollectionElementKindSectionHeader, withReuseIdentifier: baseReuseHeaderID, for: indexPath) as! BaseHeaderAndFooterCollectionReusableView
           header.backgroundColor = .purple
           header.textLabel.text = "第 \(indexPath.section) 組的頭部"
           return header
       }
       let footer = collectionView.dequeueReusableSupplementaryView(ofKind: UICollectionElementKindSectionFooter, withReuseIdentifier: baseReuseFooterID, for: indexPath) as! BaseHeaderAndFooterCollectionReusableView
       footer.textLabel.text = "第 \(indexPath.section) 組的尾部"
       footer.backgroundColor = .lightGray
       return footer
   }
最后效果:

2.自定義布局整體思路
讓類繼承
UICollectionViewLayout或者UICollectionViewFlowLayout在
prepare()方法里準備你需要布局的信息,這個方法會在第一次布局和reloadData()以及invalidateLayout()時會調(diào)用,對于那些不會隨視圖滾動而改變的布局的對象,都應(yīng)該在這里計算好,進行緩存在
collectionViewContentSize里返回collectionView的contentSize如果布局隨著范圍改變而實時改變,在
shouldInvalidateLayout(forBoundsChange:)函數(shù)里返回true-
layoutAttributesForElements(in:)里返回布局數(shù)組,如果你的布局對象都已經(jīng)緩存好了,也應(yīng)該只返回跟layAttributes.frame跟Rect相交的這個區(qū)間內(nèi)的對象數(shù)組,如下圖所示
返回屏幕范圍內(nèi)的對象.png
對于那些隨滾動而改變的item,應(yīng)該在這里進行重新計算, 記住,千萬不要在這方法里調(diào)用UICollectionView的visibleCells方法,因為這個范圍內(nèi)所有的cell還沒確定; 如果想調(diào)整滾動的位置,例如讓距離中心最近的
cell居中,在targetContentOffset(forProposedContentOffset:withScrollingVelocity:)方法里進行調(diào)整什么情況下需要自定義
UICollectionAttributes對象,首先問UICollectionViewcell為什么不跟UITableViewCell一樣,直接就把布局搞定,非要多出一個UICollectionViewLayout對象,因為它更復(fù)雜靈活,自定義程度高,那UICollectionViewcell是怎么獲取布局對象 的, 通過apply(_:)這個方法來獲取布局UICollectionAttributes對象,再根據(jù)它來布局,但UICollectionAttributes的屬性不多,例如我們想要一個錨點、一種顏色等它都是沒有的,如果你需要用到這些額外屬性傳遞給cell布局,就需要自定義布局對象;怎么自定義
UICollectionAttributes布局對象,首先在類里面添加你自定義的屬性,由于布局時會拷貝對象,需要遵守NSCoping協(xié)議,實現(xiàn)copy(with:)方法,UICollectionReusableView(Cell也是它的子類)需要實現(xiàn)apply(_:)方法,在iOS7之后,它會判斷你的布局對象是否改變,來決定是否調(diào)用apply(_:)方法,如果你的自定義UICollectionAttributes里只有自定義的屬性改變,而其它屬性沒有改變,它會視為你這個對象沒有改變,你需要重寫isEqual方法,來判斷對象是否改變對于
layoutAttributesForItem(at:)方法,它是不會主動調(diào)用的,只是讓我們在布局方法prepare() 和layoutAttributesForElements(in:)里主動調(diào)用它來獲得layoutAttributes對象,但我們一般通過UICollectionViewLayoutAttributes(forCellWith:)方法自己創(chuàng)建

3.實現(xiàn)瀑布流
瀑布流是每個item寬度相同,高度不同的一種的布局, 自定義一個繼承UICollectionViewFlowLayout的類,效果圖如下

定義基本屬性
    var cols = 4 // 列數(shù)
    /// 布局frame數(shù)組
    fileprivate lazy var layoutAttributeArray: [UICollectionViewLayoutAttributes] = []
    /// 每列的高度的數(shù)組
    fileprivate lazy var yArray: [CGFloat] = Array(repeating: self.sectionInset.top, count: self.cols)
     /// 最大高度
    fileprivate var maxHeight: CGFloat = 0
在prepare()方法里添加我們需要的布局屬性,并計算出ContentSize的最大高度,重點是怎么把每列的高度存起來,接著最小的一列繼續(xù)排列
/// 重寫Prepare方法,準備我們要緩存的布局對象
override func prepare() {
    super.prepare()
    let itemW = (collectionView!.bounds.width - sectionInset.left - sectionInset.right - minimumInteritemSpacing * CGFloat(cols - 1)) / CGFloat(cols)

    let itemCount = collectionView!.numberOfItems(inSection: 0)

    // 最小高度的那一個的索引
    var minHeightIndex = 0

    // 從 layoutAttributeArray.count 開始,避免重復(fù)加載
    for j in layoutAttributeArray.count ..< itemCount {
        let indexPath = IndexPath(item: j, section: 0)
        let attr = UICollectionViewLayoutAttributes(forCellWith: indexPath)
        // item高度,從代理中獲取
        let itemH = delegate?.waterFlowLayout(self, itemHeightAt: indexPath)

        // 找出最小高度的那一列
        let value = yArray.min()
        minHeightIndex = yArray.index(of: value!)!
        var itemY = yArray[minHeightIndex]

        // 大于第一行的高度才相加
        if j >= cols {
            itemY += minimumInteritemSpacing
        }

        let itemX = sectionInset.left + (itemW + minimumInteritemSpacing) * CGFloat(minHeightIndex)

        attr.frame = CGRect(x: itemX, y: itemY, width: itemW, height: CGFloat(itemH!))
        layoutAttributeArray.append(attr)
        // 重新設(shè)置最小列高度
        yArray[minHeightIndex] = attr.frame.maxY
    }
    maxHeight = yArray.max()! + sectionInset.bottom
 }
- 返回collectionViewContentSize的大小,記住這里寬度不能設(shè)置為0,如果設(shè)置為0,在layoutAttributesForElements(in:)不能正確的返回大小
    override var collectionViewContentSize: CGSize {
        return CGSize(width: collectionView!.bounds.width, height: maxHeight)
    }
- 在layoutAttributesForElements返回布局對象數(shù)組
    override func layoutAttributesForElements(in rect: CGRect) -> [UICollectionViewLayoutAttributes]? {
        // 找出相交的那些,別全部返回
        return layoutAttributeArray.filter { $0.frame.intersects(rect)}
    }
4.每頁多個Cell的水平方向滾動布局
如果每頁的item很多,而且是水平方向滾動,item是一列一列的排,這給我們很不好的感覺,因為我們習(xí)慣是一行一行看的,原效果圖如下

我們需要改成按水平方向排列的效果:

實現(xiàn)方法跟瀑布流基本類似,首先定義基本屬性
    var cols = 4 // 列數(shù),默認為4
    var line = 4  // 行數(shù),默認為4

    /// contentSize的最大寬度
    fileprivate var maxWidth: CGFloat = 0

    /// 布局frame數(shù)組
    fileprivate lazy var layoutAttributeArray: [UICollectionViewLayoutAttributes] = []
在prepare()方法里添加我們需要的布局屬性,并計算出ContentSize的最大寬度,重點就是怎么把位置給算出來
/// 重寫Prepare方法,準備我們要緩存的布局對象
override func prepare() {
    super.prepare()
    // 每個item的寬度
    let itemW = (collectionView!.bounds.width - sectionInset.left - sectionInset.right - minimumInteritemSpacing * CGFloat(cols - 1)) / CGFloat(cols)
    // 每個item的高度
    let itemH = (collectionView!.bounds.height - sectionInset.top - sectionInset.bottom - minimumLineSpacing * CGFloat(line - 1)) / CGFloat(line)

    // 求出對應(yīng)的組數(shù)
    let sections = collectionView?.numberOfSections
    // 每個item所在組的 前面總的頁數(shù)
    var prePageCount: Int = 0
    for i in 0..<sections! {
        // 每組的item的總的個數(shù)
        let itemCount = collectionView!.numberOfItems(inSection: i)
        for j in 0..<itemCount {
            let indexPath = IndexPath(item: j, section: i)
            let attr = UICollectionViewLayoutAttributes(forCellWith: indexPath)

            // item 在 這一組內(nèi)處于第幾頁
            let page = j / (cols * line)
            // item 在每一頁內(nèi)是處于第幾個
            let index = j % (cols * line)

            // item的y值
            let itemY = sectionInset.top + (itemH + minimumLineSpacing) * CGFloat(index / cols)

            // item的x值 為 左切距 + 前面頁數(shù)寬度 + 在本頁中的X值
            let itemX = sectionInset.left + CGFloat(prePageCount + page) * collectionView!.bounds.width + (itemW + minimumInteritemSpacing) * CGFloat(index % cols)

            attr.frame = CGRect(x: itemX, y: itemY, width: itemW, height: itemH)

            layoutAttributeArray.append(attr)
        }
        // 重置 PrePageCount
        prePageCount += (itemCount - 1) / (cols * line) + 1
    }
    // 最大寬度
    maxWidth = CGFloat(prePageCount) * collectionView!.bounds.width
}
- 返回collectionViewContentSize的大小
    override var collectionViewContentSize: CGSize {
        return CGSize(width: maxWidth, height: 0)
    }
- 在layoutAttributesForElements返回布局對象數(shù)組
    override func layoutAttributesForElements(in rect: CGRect) -> [UICollectionViewLayoutAttributes]? {
        // 找出相交的那些,別全部返回
        return layoutAttributeArray.filter { $0.frame.intersects(rect)}
    }
5.實現(xiàn)CoverFlow效果
CoverFlow是一種很酷的封面瀏覽效果,item的大小隨著滑動而縮放,滑動結(jié)束時,距中最近的一個item局中顯示,效果圖如下

- 因為item大小隨范圍變化而實時變化,在prepare()方法里計算緩存已經(jīng)無用,需要在layoutAttributesForElements(in:)里親自計算來返回布局對象數(shù)組
    override func layoutAttributesForElements(in rect: CGRect) -> [UICollectionViewLayoutAttributes]? {
        // 獲取這個范圍的布局數(shù)組
        let attributes = super.layoutAttributesForElements(in: rect)
        // 找到中心點
        let centerX = collectionView!.contentOffset.x + collectionView!.bounds.width / 2

        // 每個點根據(jù)距離中心點距離進行縮放
        attributes!.forEach({ (attr) in
            let pad = abs(centerX - attr.center.x)
            let scale = 1.8 - pad / collectionView!.bounds.width
            attr.transform = CGAffineTransform(scaleX: scale, y: scale)
        })
        return attributes
    }
- 讓滾動停止時,距中心最近item居中顯示
    /// 重寫滾動時停下的位置
    ///
    /// - Parameters:
    ///   - proposedContentOffset: 將要停止的點
    ///   - velocity: 滾動速度
    /// - Returns: 滾動停止的點
    override func targetContentOffset(forProposedContentOffset proposedContentOffset: CGPoint, withScrollingVelocity velocity: CGPoint) -> CGPoint {
        var targetPoint = proposedContentOffset

        // 中心點
        let centerX = proposedContentOffset.x + collectionView!.bounds.width

        // 獲取這個范圍的布局數(shù)組
        let attributes = self.layoutAttributesForElements(in: CGRect(x: proposedContentOffset.x, y: proposedContentOffset.y, width: collectionView!.bounds.width, height: collectionView!.bounds.height))

        // 需要移動的最小距離
        var moveDistance: CGFloat = CGFloat(MAXFLOAT)
        // 遍歷數(shù)組找出最小距離
        attributes!.forEach { (attr) in
            if abs(attr.center.x - centerX) < abs(moveDistance) {
                moveDistance = attr.center.x - centerX
            }
        }
        // 只有在ContentSize范圍內(nèi),才進行移動
        if targetPoint.x > 0 && targetPoint.x < collectionViewContentSize.width - collectionView!.bounds.width {
            targetPoint.x += moveDistance
        }

        return targetPoint
    }
- Bounds變化時,應(yīng)該重新布局
    override func shouldInvalidateLayout(forBoundsChange newBounds: CGRect) -> Bool {
        return true
    }
- 返回collectionViewContentSize的大小
    override var collectionViewContentSize: CGSize {
        return CGSize(width:sectionInset.left + sectionInset.right + (CGFloat(collectionView!.numberOfItems(inSection: 0)) * (itemSize.width + minimumLineSpacing)) - minimumLineSpacing, height: 0)
    }
- 為了讓中間的cell不被攔住,我們需要把它放到最前面,在控制器中實現(xiàn)這些方法
    /// 把中間的cell帶到最前面
    fileprivate func bringMiddleCellToFront() {
        let pointX = (collectionView.contentOffset.x + collectionView.bounds.width / 2)
        let point = CGPoint(x: pointX, y: collectionView.bounds.height / 2)
         // 找到中心點的indexPath
        let indexPath = collectionView.indexPathForItem(at: point)
        if let letIndexPath = indexPath {
            let cell = collectionView.cellForItem(at: letIndexPath)
            guard let letCell = cell else {
                return
            }
            // 把cell放到最前面
            collectionView.bringSubview(toFront: letCell)
        }
    }

    /// 第一次顯示需要主動調(diào)用把中間的cell的放在最前面
    override func viewDidLayoutSubviews() {
        super.viewDidLayoutSubviews()
        bringMiddleCellToFront()
    }
    /// 滾動時,每次調(diào)用這方法
    func scrollViewDidScroll(_ scrollView: UIScrollView) {
        bringMiddleCellToFront()
    }
6.實現(xiàn)輪轉(zhuǎn)卡片效果
在輪轉(zhuǎn)卡片中,我們需要用到自定義UICollectionViewLayoutAttributes的自定義類,來改變cell的錨點和positon, 從而改變cell的旋轉(zhuǎn)角度

- 首先自定義
UICollectionViewLayoutAttributes類,添加錨點屬性,一定要遵守NSCoping協(xié)議, 因為不只自定義屬性錨點實時改變,還有自帶的transform屬性改變,可以不重寫isEqual方法
/// 主要為了存儲 anchorPoint,好在cell的apply(_:)方法中使用來旋轉(zhuǎn)cell,因為UICollectionViewLayoutAttributes沒有這個屬性
class CircularCollectionViewLayoutAttributes: UICollectionViewLayoutAttributes {

    var anchorPoint = CGPoint(x: 0.5, y: 0.5)

    /// 需要實現(xiàn)這個方法,collection View  實時布局時,會copy參數(shù),確保自身的參數(shù)被copy
    override func copy(with zone: NSZone? = nil) -> Any {
        let copiedAttributes: CircularCollectionViewLayoutAttributes = super.copy(with: zone) as! CircularCollectionViewLayoutAttributes
        copiedAttributes.anchorPoint = anchorPoint
        return copiedAttributes
    }
}
在自定義UICollectionViewLayout對象中,自定義屬性
有n個item, 我們就設(shè)ContentSize的寬度為 item * n
每個item的相對于上一個item的偏移角度我們自定義一個為 anglePerItem
當偏移量為 0時,第一個item處于正中間,偏移角度為0,當collectionView的偏移量最大時,最后一個item處于正中間,偏移角度為0
    /// 每個item的大小
    let itemSize = CGSize(width: 133, height: 173)

    /// 屬性數(shù)組
    var attributesList: [CircularCollectionViewLayoutAttributes] = []

    /// 設(shè)置半徑,需要重新設(shè)置布局
    var radius: CGFloat = 500 {
        didSet {
            invalidateLayout()
        }
    }

    /// 每兩個item 之間的角度,任意值
    var anglePerItem: CGFloat {
        return atan(itemSize.width / radius)  // atan反正切
    }

    /// 當collectionView滑到極端時,第 0個item的角度 (第0個開始是 0 度,  當滑到極端時, 最后一個是 0 度)
    var angleAtextreme: CGFloat {
        return collectionView!.numberOfItems(inSection: 0) > 0 ? -CGFloat(collectionView!.numberOfItems(inSection: 0) - 1) * anglePerItem : 0
    }

    /// 滑動時,第0個item的角度
    var angle: CGFloat {
        return angleAtextreme * collectionView!.contentOffset.x / (collectionViewContentSize.width - collectionView!.bounds.width)
    }
- 重寫prepare()方法,求出相對應(yīng)的屬性數(shù)組attributesList
override func prepare() {
    super.prepare()

    // 整體布局是將每個item設(shè)置在屏幕中心,然后旋轉(zhuǎn) anglePerItem * i 度
    let centerX = collectionView!.contentOffset.x + collectionView!.bounds.width / 2.0
    // 錨點的y值,多增加了raidus的值
    let anchorPointY = ((itemSize.height / 2.0) + radius) / itemSize.height

    /// 不要計算所有的item,只計算在屏幕中的item,theta最大傾斜
    let theta = atan2(collectionView!.bounds.width / 2, radius + (itemSize.height / 2.0) - collectionView!.bounds.height / 2)
    var startIndex = 0
    var endIndex = collectionView!.numberOfItems(inSection: 0) - 1
    // 開始位置
    if angle < -theta {
        startIndex = Int(floor((-theta - angle) / anglePerItem))
    }
    // 結(jié)束為止
    endIndex = min(endIndex, Int(ceil((theta - angle) / anglePerItem)))

    if endIndex < startIndex {
        endIndex = 0
        startIndex = 0
    }
    //  startIndex...endIndex
    attributesList = (startIndex...endIndex).map({ (i) -> CircularCollectionViewLayoutAttributes in
        let attributes = CircularCollectionViewLayoutAttributes(forCellWith: IndexPath(item: i, section: 0))
        attributes.size = self.itemSize
        // 設(shè)置居中
        attributes.center = CGPoint(x: centerX, y: collectionView!.bounds.midY)
        // 設(shè)置偏移角度
        attributes.transform = CGAffineTransform(rotationAngle: self.angle + anglePerItem * CGFloat(i))
        // 錨點,我們自定義的屬性
        attributes.anchorPoint = CGPoint(x: 0.5, y: anchorPointY)
        return attributes
    })
}
- 在
layoutAttributesForElements(in:)返回布局數(shù)組
    // 返回布局數(shù)組
    override func layoutAttributesForElements(in rect: CGRect) -> [UICollectionViewLayoutAttributes]? {
        return attributesList
    }
- 讓滾動停止時,距中心最近item居中顯示
     /// 重寫滾動時停下的位置
    ///
    /// - Parameters:
    ///   - proposedContentOffset: 將要停止的點
    ///   - velocity: 滾動速度
    /// - Returns: 滾動停止的點
    override func targetContentOffset(forProposedContentOffset proposedContentOffset: CGPoint, withScrollingVelocity velocity: CGPoint) -> CGPoint {

        var finalContentOffset = proposedContentOffset

        // 每單位偏移量對應(yīng)的偏移角度
        let factor = -angleAtextreme / (collectionViewContentSize.width - collectionView!.bounds.width)
        let proposedAngle = proposedContentOffset.x * factor

        // 大約偏移了多少個
        let ratio = proposedAngle / anglePerItem

        var multiplier: CGFloat

        // 往左滑動,讓multiplier成為整個
        if velocity.x > 0 {
            multiplier = ceil(ratio)
        } else if (velocity.x < 0) {  // 往右滑動
            multiplier = floor(ratio)
        } else {
            multiplier = round(ratio)
        }

        finalContentOffset.x = multiplier * anglePerItem / factor

        return finalContentOffset

    }
- Bounds變化時,應(yīng)該重新布局
    override func shouldInvalidateLayout(forBoundsChange newBounds: CGRect) -> Bool {
        return true
    }
- 返回collectionViewContentSize的大小,為item * n
    override var collectionViewContentSize: CGSize {
        return CGSize(width: CGFloat(collectionView!.numberOfItems(inSection: 0)) * itemSize.width, height: collectionView!.bounds.height)
    }
- 在我們自定的cell中重寫
apply(_:)方法,拿到layoutAttribute中的錨點進行布局
     override func apply(_ layoutAttributes: UICollectionViewLayoutAttributes) {
        super.apply(layoutAttributes)
        let circularlayoutAttributes = layoutAttributes as! CircularCollectionViewLayoutAttributes
        layer.anchorPoint = circularlayoutAttributes.anchorPoint
        layer.position.y = layer.position.y + (circularlayoutAttributes.anchorPoint.y - 0.5) * bounds.height
     }
7. 模仿今日頭條實現(xiàn)Cell重排
移動cell在照片排版和新聞類的APP中比較常見,主要用到的是moveItem(at indexPath: IndexPath, to newIndexPath: IndexPath)這個方法進行交換,主要思路
給collectionView添加長按和拖拽手勢,拖拽手勢主要是點擊進入編輯狀態(tài)后,可拖拽cell直接進行交換,因為拖拽手勢不比長按手勢需要按一段時間才開始,反應(yīng)很快,快速滑動時,有很多問題,需要留意
根據(jù)手勢的三種狀態(tài)對cell進行操作,手勢開始時對cell進行截圖,并隱藏開始cell, 手勢移動時,讓截圖跟著移動,當?shù)竭_別的cell上時,進行交換,手勢結(jié)束時,移除截圖,并讓隱藏的開始cell顯示
點擊cell,移動它進行添加刪除
主要效果圖如下:

- 給collectionView添加手勢
 /// collectionView的pan手勢
    func panGestureRecognized(_ sender: UIPanGestureRecognizer) {
        guard self.isEdit else { return }
        handleGesture(sender)
    }

    /// collectionView的長按手勢
    func longPressGestureRecognized(_ sender: UILongPressGestureRecognizer) {
        handleGesture(sender)
    }

    func handleGesture(_ sender: UIGestureRecognizer) {
        let senderState = sender.state
        // 手指在collectionView中的位置
        fingerLocation = sender.location(in: collectionView)
        // 手指按住位置對應(yīng)的indexPath,可能為nil
        relocatedIndexPath = collectionView?.indexPathForItem(at: fingerLocation)

        switch senderState {
        case .began:
              //  根據(jù)relocatedIndexPath,找出cell,隱藏它,并截圖
        case .changed:
             //  根據(jù)fingerLocation,移動cell,如果到達其它cell上,交換兩個cell
        case .ended:
            // 移除截圖,并讓開始cell,顯示
            didEndDraging()
  }

    /// 拖動結(jié)束,顯示cell,并移除截圖
    func didEndDraging() {
        ...
        UIView.animate(withDuration: 0.2, animations: {
            self.snapshot!.center = cell!.center
            // 隱藏截圖
            self.snapshot!.alpha = 0
            self.snapshot!.transform = .identity
            cell?.alpha = 1
        }) { (_) in
            self.snapshot!.removeFromSuperview()
            self.snapshot = nil
            self.originalIndexPath = nil
            self.relocatedIndexPath = nil
        }
    }
- 因為結(jié)束手勢后,隱藏截圖的動畫時間設(shè)置了0.2秒,在動畫還沒結(jié)束時,可能又開啟了另一個拖拽手勢,我們需要給拖拽手勢設(shè)置代理,并決定是否啟用它
    func gestureRecognizerShouldBegin(_ gestureRecognizer: UIGestureRecognizer) -> Bool {
        let sender = gestureRecognizer as! UIPanGestureRecognizer
        let trnslationPoint = sender.translation(in: collectionView)
        // 結(jié)束動畫有時間,掃的手勢很容易出問題,需要保證 snapshot == nil,才讓它開始,
        // pan手勢結(jié)束和開始可能會特別快,需要格外留心,
        // 為了保證pan手勢不影響collectionView的豎直滑動,豎直方向偏移不讓它開始
        if abs(trnslationPoint.x) > 0.2  && snapshot == nil {
            return true
        }
        return false
    }
具體詳情參見示例代碼
8. iOS9使用系統(tǒng)自帶屬性進行重排
在iOS9 之后,蘋果給collectionView推出了幾個方法
beginInteractiveMovementForItem(at:)
updateInteractiveMovementTargetPosition(_ :)
endInteractiveMovement()
cancelInteractiveMovement()
四個方法分別為開始交互、更新交互位置、結(jié)束交互、取消交互,跟上面的一樣給collectionView添加手勢,在手勢的三種狀態(tài)里面,分別調(diào)用上面相應(yīng)的四種方法,實現(xiàn)系統(tǒng)的collectionView(_:moveItemAt:to:)方法,更新數(shù)據(jù)源,實現(xiàn)效果如下

func handleLongGesture(_ gesture: UILongPressGestureRecognizer) {
    switch(gesture.state) {

    case .began:
        guard let selectedIndexPath = self.collectionView.indexPathForItem(at: gesture.location(in: self.collectionView)) else {
            break
        }
        // 開始交互
        collectionView.beginInteractiveMovementForItem(at: selectedIndexPath)
    case .changed:
        // 更新位置
        collectionView.updateInteractiveMovementTargetPosition(gesture.location(in: gesture.view!))
    case .ended:
        // 結(jié)束交互
        collectionView.endInteractiveMovement()
    default:
        // 默認取消交互
        collectionView.cancelInteractiveMovement()
    }
}

/// 更新我們自己的數(shù)據(jù)源
func collectionView(_ collectionView: UICollectionView, moveItemAt sourceIndexPath: IndexPath, to destinationIndexPath: IndexPath) {
    let number = dataNumbers.remove(at: sourceIndexPath.item)
    dataNumbers.insert(number, at: destinationIndexPath.item)
    }
它的使用很簡單,如果控制器是
UICollectionViewController,不需要我們調(diào)用交互方法,就可以實現(xiàn)拖拽cell了,只需要在collectionView(_:moveItemAt:to:)方法里,更新數(shù)據(jù)源,如果我們想關(guān)閉拖拽功能,設(shè)置installsStandardGestureForInteractiveMovement為false就行了拖拽時,當cell觸及到屏幕邊緣時它會自動滾動,在iOS10中,如果設(shè)置了屬性collectionveiw的isPagingEnabled屬性為true,拖拽到屏幕邊緣時會翻頁滾動,蘋果的設(shè)計是需要拖到邊緣稍微停留一會兒才翻頁,而不翻頁滾動的只需要cell觸碰到邊緣就會馬上移動
iOS10后UICollectionView的優(yōu)化與預(yù)加載
為了使UICollectionView的滑動更流暢,官方進行了一些優(yōu)化,首先得明白cell的加載順序是什么樣的,是先調(diào)用collectionView(_:cellForItemAt:)數(shù)據(jù)源方法,再調(diào)用collectionView(_:willDisplay:forItemAt:)顯示cell,cell消失調(diào)用collectionView(_:didEndDisplaying:forItemAt:)方法
在iOS9以前,只到了屏幕邊緣才調(diào)用
cellForItemAt方法,調(diào)用完之后馬上就會調(diào)用willDisplay, 但在iOS10中,willDisplay這方法還是跟以前一樣,只在cell馬上進入屏幕的時候才調(diào)用, 而cellForItemAt卻提前了,它會在距離屏幕邊緣還有一段距離的時候就調(diào)用,這樣保證了我們有更多的時間去加載我們的資源cell的生命周期延長,滑出屏幕之后,它會保留一段時間,如果cell快速滑動時,卻突然向相反方向快速滑動,這時它不會調(diào)用
cellForItemAt方法,而是直接調(diào)用willDisplay方法,如果是在cellForItemAt方法里動態(tài)改變cell屬性,就需要留意了,可能會出現(xiàn)問題,因為這個方法根本不會調(diào)用,如果還是想在這方法里改變cell, 跟iOS9一樣,可以設(shè)置collectionView的isPrefetchingEnabled為false如果collectionView每行有多列cell,在iOS9會整行整行的加載,而到了iOS10它會一個一個的加載,保證了流暢性
提供了預(yù)加載方法,
collectionView(_ collectionView: UICollectionView, prefetchItemsAt indexPaths: [IndexPath]),在這里提前加載圖片資源,注意這些資源一定要是異步加載,仔細觀察了下,屏幕有多個cell,它就多加載多少個cell, 但是我發(fā)現(xiàn)cellForItemAt方法居然在滑動時也提前加載了這么多個cell,唯一不同的是實現(xiàn)了這些代理方法,我們會在第一次沒有滑動顯示時,collectionView(_:prefetchItemsAt:)會提前加載屏幕這么多的cell,而cellForItemAt只加載屏幕上顯示的cell,不會多加載屏幕以外的cell取消預(yù)加載方法
collectionView(_:cancelPrefetchingForItemsAt:),它只在快速滑動還沒停下來時,突然往相反方向快速滑動調(diào)用,當它調(diào)用時,程序也基本不會走cellForItemAt方法,直接走willDisplaycell方法顯示cell
實現(xiàn)預(yù)加載,效果圖如下:

- 遵守協(xié)議
collectionView?.prefetchDataSource = self - 實現(xiàn)預(yù)加載數(shù)據(jù)源協(xié)議
// 預(yù)加載,每次都會領(lǐng)先基本一頁的數(shù)據(jù)
func collectionView(_ collectionView: UICollectionView, prefetchItemsAt indexPaths: [IndexPath]) {
    let urls = indexPaths.flatMap {
        URL(string: dataArray[$0.item])
    }
    // 開始下載
    ImagePrefetcher(urls: urls).start()
}

// 取消預(yù)加載,會在快速滑動還沒停下來時,突然往相反方向快速滑動調(diào)用,當它調(diào)用, 程序也基本不會走cellForItemAt 方法, 直接走 willDisplaycell方法
func collectionView(_ collectionView: UICollectionView, cancelPrefetchingForItemsAt indexPaths: [IndexPath]) {
    let urls = indexPaths.flatMap {
        URL(string: dataArray[$0.item])
    }
    // 取消下載
    ImagePrefetcher(urls: urls).stop()
}
結(jié)語
斷斷續(xù)續(xù)花了不少時間終于寫完了,但覺得挺值得的,感覺最深的就是這控件太靈活了
